Tutoriels Backend
Start a Web Application with Angular
We are going to create a Web Application.
In this tutorial we will be using Angular version 20.1.3
To start our application we will start from scratch, striving to follow Angular best practices .
- Angular was created by Google .
- Angular is open source , so it is free to use.
- Angular uses Typescript .
- Angular is a Javascript Frontend framework.
If you don't have time to read this entire guide,
download it now
How to do it?
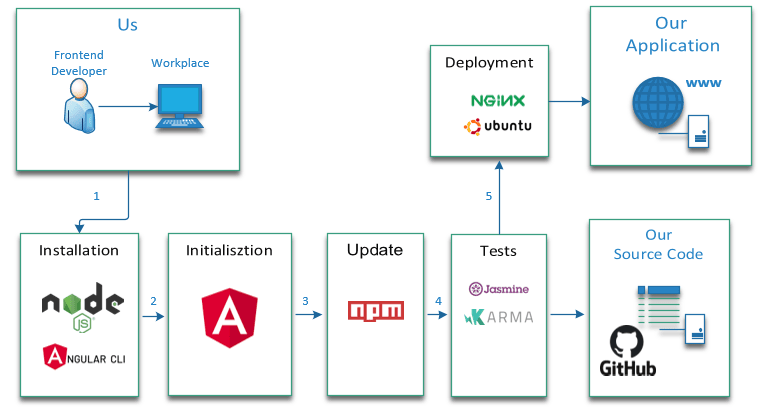
To begin our project, here is a summary of what we are going to do.
- Installing the necessary tools
Node.js will be our javascript development platform.
No choice, without Node.js it won't work.
Visual Studio Code will be our code editor.
The choice is totally arbitrary but for a Microsoft tool it is a little marvel.
Git will be our software manager.
Thanks to it you will be able to use the source code of this tutorial.
Angular CLI will be our jack of all trades.
Probably the most well-known and used tool in the Angular Framework. - Project Initialization
We will use Angular CLI for setting up the project architecture,
using the best practices recommended by Google. - Project Update
Check the dependencies used and update them. - Perform the Tests
Unit tests and the tools dedicated to them Karma and Jasmine.
Linting and improving code with ESLint. - Environment
Since version 15 the Angular team no longer integrates environment parameters.
Very useful, we will see how to declare and use them. - Deployment
How to deploy your application on the internet. - Source code
The full code of the project is available on Github.
A picture is worth a thousand words
The summary in pictures of what we are going to do
If you are in a hurry, below is a summary of commands, otherwise go to the next step.
# Uninstall Angular CLI (in case an older version of Angular was installed)
npm uninstall -g @angular/cli

# Install Angular CLI specific version (latest if possible)
npm install -g @angular/cli@20.1.3

# Create a demo directory (the name is arbitrary here)
mkdir demo

# Go to this directory
cd demo

# Generate a project called angular-starter with manual choice of options
# Select default options
ng new angular-starter

# Position yourself in the project
cd angular-starter

# Run the application
npm run start

# Test the application in your browser
http://localhost:4200
And if you are less in a hurry it will start
We're going to do things seriously, but we're not going to take ourselves seriously.
So here we go for a little humor and a lot of technique.
without AI

with AI

Installing the necessary tools for Angular
Before using Angular we need to install a number of software
- Node.js
Can't run Angular without it. - Visual Studio Code
This choice is arbitrary. - Git
Very useful but not essential - Angular CLI
He is the jack of all trades for Angular.
Installing Node.js
If you don't install it, Angular won't work.
By the way Angular, React and Vuejs all need Node.js.
The official website is here https://nodejs.org/en
This is what he tells us:
Node.js is a JavaScript runtime environment built on Chrome's V8 JavaScript engine.
Its inventor Ryan Lienhart Dahl created it on May 27, 2009.
He had a specific idea in mind: the simplicity and speed of execution of programs written in JavaScript .
The choice of name is therefore not insignificant.
- Node means node
- JS means javascript
Node.js is thus the central point which will allow programs written in JavaScript to be executed on the server side.
My God! It's full of stars!
Node.js uses a npm (Node Package Manager) tool
Npm makes developer life easier by allowing you to publish and share Node.js libraries.
Npm makes it possible to simplify the installation, update or uninstallation of these libraries.
We can talk about libraries, packages or dependencies.
How to install it?
On the official website the download is available at the address
https://nodejs.org/en
We will use the LTS ( Long Term Support ) version.
LTS means that the publisher generally guarantees us a maintenance period of at least two years,
- Node.js version 24.12.0 LTS
- npm (node package manager) version 11.4.1
This is a classic installation.
- Select Download Node.js (LTS) .
- Download the program and run it.
Once the installation is done, we can verify that Node.js is installed on our workstation.
# Checking Node.js and npm version (method 1)
node --version
npm --version

# Checking Node.js and npm version (method 2)
node -v
npm -v

# npm update
npm install npm -g

# Checking for npm update
npm -v
How do I know if Node.js is working?

Let's go to Wikipedia https://fr.wikipedia.org/wiki/Node.js
Let's test the example program "a Hello Word" that he offers us.
Create an index.js file with a code editor (notepad will do).
Copy the following example code
const { createServer } = require('http');

// Création du serveur
const server = createServer((request, response) => {
    response.writeHead(200, {'Content-Type': 'text/plain'});
    response.end('Hello World\n');
});

server.listen(3000, () => console.log(`Adresse du serveur : http://localhost:3000`));# Execution of the javascript program
node index.js
# Verification in browser
http://localhost:3000Installing Visual Studio Code
Visual Studio Code is the editor used in most Angular conferences.
It is notably used by John Papa one of the best Angular speakers and author of the Angular guides
https://github.com/johnpapa/angular-styleguide
In the rest of the tutorial we will therefore use Visual Studio Code .
VS Code is a code editor developed by Microsoft for Windows, Linux and OS X.
Let's proceed with the installation.
The official website is here https://code.visualstudio.com/
We will use the latest version 1.100.2 to download here
https://code.visualstudio.com/updates/v1_100
Installation is as simple as Node.js.
Click on Download for Windows
Download and run
Installing Git
Writing a Web Application is a bit like writing a book.
As time passes, the number of pages increases.
From a few hundred you can go to thousands of pages.
The number of modifications becomes considerable and finding your way around is no easy task.
Questions, questions, too many questions

To manage this problem, tools have been developed.
These are version control system software (or VCS in English).
The most famous is Git . It was created by Linus Torval the creator of Linux.
It will allow us to manage our source code and its different versions.
And above all, to be able to share this source code, thus allowing several people to work together.
Git will also allow you to use and test the source code of this tutorial.
Let's move on to the installation.
The official website is at https://git-scm.com/
Installation is available here https://git-scm.com/download/win
Download the application and then run it.
To check that Git is installed on your workstation, simply launch a command line.
# Test version
git --version
Installing Angular CLI
Angular CLI stands for Angular Command Line Interface.
But that's mostly it.
Angular's Jack of All Trades

And might as well use the most recent version.
Angular version 20.1.3
Angular CLI version 20.1.3
The latest versions of these tools are available below
https://github.com/angular/angular/releases
https://github.com/angular/angular-cli/releases
The installation procedure is detailed on the official Angular website
https://angular.dev/tools/cli/setup-local#dependencies
The method is described on the official website page.
I will detail this one.
- If a previous version was installed on your computer you can uninstall it with the following command
# Uninstalling angular-cli
npm uninstall -g @angular/cliAngular CLI is a library (or package).
We will install it with npm the node.js manager
You can install a specific version of Angular or install the latest available by default.
# Installing angular-cli latest version available
npm install -g @angular/cli

# Installing angular-cli specific version
npm install -g @angular/cli@20.1.3

# Installed version test
ng versionInitializing the project with Angular CLI
Angular is a comprehensive framework that covers a large number of features.
The documentation is particularly comprehensive and detailed.
We will try as often as possible to respect the best practices recommended by the Angular team.
We can create each element of our application manually but the easiest way is to use Angular CLI
Create our application with Angular CLI
Angular CLI is a tool for initializing, developing, and maintaining Angular applications.
The official website is here https://angular.dev/cli
And if you want to have the list of Angular CLI commands
https://github.com/angular/angular-cli/wiki
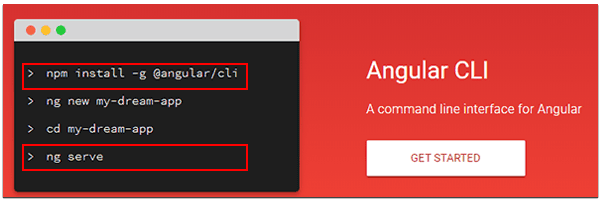
To go faster, I will give you an essential summary.
Angular CLI provides us with a number of commands.
These commands save us from performing repetitive tasks.
The first command we are going to use is ng new or ng n
- She will create our application.
- It will generate all the files needed for this application.
- It will obviously follow the best practices recommended by the Google team.
We choose the name of our application (arbitrarily it will be angular-starter here)
We type the command ng new with the corresponding parameters
- We generate the project ( this part takes a few minutes )
- For easier understanding we will handle routing and sass in another tutorial.
- Choose CSS type (default Yes)
- Disable Server side Rendering (default No)
- We position ourselves in the project
- We are executing the project
Which gives
# Generate a project called angular-starter with manual choice of options
ng new angular-starter

# Generate a project called angular-starter with default options
ng new angular-starter --defaults

# Position yourself in the project
cd angular-starter

# Execute
ng serve

# Run and automatically launch the application in the browser
ng serve -o
Angular CLI via ng serve command executes the project on a default port (4200).
All that remains is to test the operation in a browser by launching the following url.
# Test
http://localhost:4200
Using our application with Visual Studio Code
Launch VS Code .
Open a folder in the angular-starter directory we created during initialization.
Then open the package.json file.
This contains a number of commands (or scripts) that we will use throughout this tutorial.
Open a VS Code console (select View/Terminal) to run the following scripts
- npm run start : Runs the application in development mode.
- npm run build : Compiles the application in the dist directory.
- npm run test : Runs unit tests using the Karma framework.
Note for those nostalgic for previous versions
The ng eject command (used to generate webpack configuration) has been disabled.
It has been removed since version 8
Configuration Format Management Example Project
https://github.com/manfredsteyer/ngx-build-plus
In development mode if we want to customize the port we just need to modify the start script in the package.json file.
For example to use port 4201 the script would be as follows "start": " ng serve --port 4201 "
We will leave port 4200 modifiable at will for the rest of the tutorial.
  "scripts": {
    "ng": "ng",
    "start": "ng serve --port 4200",
    "build": "ng build",
    "watch": "ng build --watch --configuration development",
    "test": "ng test"
  },
Update package.json
Node.js is the platform to develop our application.
Node.js is based on the use of libraries or dependencies.
Npm is the library manager (packages in English)
Updating an application and therefore its libraries is a perilous matter.
I'll show you that with Angular the notion of updating versions is essential.
It must be carried out with caution.

Update or not update
Javascript libraries are constantly modified and updated by their designer.
When a new version is available it is called a release and has a specific number.
If the library is open-source you can see the latest versions available by going to the corresponding repository on Github then going to Releases.
For example, the different versions of Angular are accessible here
https://github.com/angular/angular/releases
The update schedule is here
https://angular.dev/reference/releases#versioning
Your past, your present and your future.
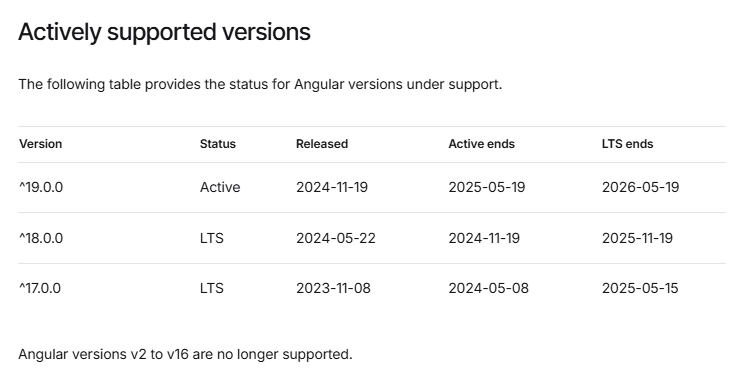
Note that versions 2 through 17 are no longer supported.
And the danger is obviously that all these updates will alter the functioning of our application.
In any case, we cannot escape them; one day or another we will have to try to integrate them into our projects.
I will explain to you how I personally proceed.
I didn't think that far ahead
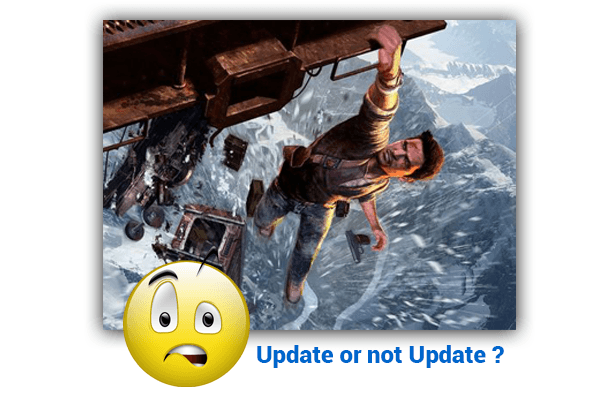
How do we do it?
Let's use npm (Node Package Manager) the Node.js library manager.
The complete documentation is
here https://docs.npmjs.com/cli/outdated.html
Two commands will be useful to us
Check the versions actually installed
- npm list --depht=0
This command checks the dependencies actually installed in the node_modules directory.
It provides us with a list that we can enter in package.json (see Note)
Check the versions of our libraries via the command
- npm outdated
This command checks the dependency registry to see if the installed packages are up to date.
This provides us with a list that we can control.
Noticed
Before checking dependencies let's update the package.json file according to the provided versions
by the npm list command
For each dependency indicated remove the ~ or ^ character
For example replace
- "rxjs": "~7.8.0",
- "tslib": "^2.3.0",
by
- "rxjs": "7.8.2",
- "tslib": "2.8.1",
To avoid possible errors, delete first
the package-lock.json file and the node_modules directory.
Then reinstall the dependencies with npm install (package-lock.json and node_modules are then recreated automatically).
# Checking versions of dependencies installed in node_modules
 npm list --depth=0

# Checking available dependencies
npm outdated
If I update the package.json file I find myself faced with 3 scenarios
- 1/ It works
It's not a party every day, but since Angular 8 it's more and more often. - 2/ It doesn't work, we try to debug without spending too much time on it.
It depends on your patience and the time you have in front of you. - 3/ It doesn't work and we wait.
Often (but not always) Angular fixes your problem with the next update.
In any case, there is no point in waiting indefinitely; we will have to find a solution.
Or we end up with AngularJS in 2022 and then we're not in trouble.

Our Angular prototype
The ideal is to have an application prototype that contains enough features.
You can be pretty sure that the update will work on most of your apps.
Of course, this will not save you from optimizing your CI/CD and taking care of your tests.

In any case, here is a list of the essential features of an application in my opinion.
- Routing
- Lazy Loading
- Bootstrap
- Httpclient
- SSR
- PWA
- SEO
- Components
- Services
- Observables
- Instructions
- Paging
- ScrollBox
- Charts
- Authentication (authentication/Route guard/Role guard/Jwt)
- Ngrx
- Reactiveform / Tempate Driven form
- Modal Form
- Internationalization
- Tests (unit and end-to-end)
The repository that I currently use as a prototype is the following.
https://github.com/ganatan/angular-app
So here we go for the update
For the example we will use this method on our angular-starter application.
The package.json file contains the various dependencies of your project.
Dependencies are basically all the libraries you have decided to use in your project.
They are managed by npm (node package manager), the Node.js dependency manager.
Regarding dependencies and their version, the npm documentation is as follows
https://docs.npmjs.com/files/package.json#dependencies
There are many version specifiers.
We can use for example
- version Must match version exactly
- ~version "Approximately equivalent to version"
- ^version “Compatible with version”
We will opt for the first specifier " version ", which is the simplest, the most explicit but also the most restrictive.
We will update the package.json file with the latest dependencies

- To check which dependencies to update, run the command
npm outdated
- In some cases all dependencies can be updated except typescript
For example, Angular 20.1.3 accepts TypeScript greater than or equal to 5.8.3
You can check this after the update by running the npm run build script
- In the case of Angular 20.1.3 all dependencies can be put.
- Delete the package-lock.json file and the node_modules directory
Modify the package.json file as follows and then run the script
npm install
  "dependencies": {
    "@angular/common": "20.1.3",
    "@angular/compiler": "20.1.3",
    "@angular/core": "20.1.3",
    "@angular/forms": "20.1.3",
    "@angular/platform-browser": "20.1.3",
    "@angular/router": "20.1.3",
    "express": "5.1.0",
    "rxjs": "7.8.2",
    "tslib": "2.8.1",
    "zone.js": "0.15.1"
  },
  "devDependencies": {
    "@angular/build": "20.1.3",
    "@angular/cli": "20.1.3",
    "@angular/compiler-cli": "20.1.3",
    "@types/jasmine": "5.1.8",
    "angular-eslint": "20.1.1",
    "eslint": "9.32.0",
    "jasmine-core": "5.9.0",
    "karma": "6.4.4",
    "karma-chrome-launcher": "3.2.0",
    "karma-coverage": "2.2.1",
    "karma-jasmine": "5.1.0",
    "karma-jasmine-html-reporter": "2.1.0",
    "typescript": "5.8.3",
    "typescript-eslint": "8.38.0"
  }
Then just test all the scripts to verify that the updates worked.
Testing and deployment
Development has entered its industrialization phase.
As with other industries, quality and quantity must be there.
Agile methods were invented for this.
Testing is an integral part of this.
We will see that the designers of Angular have thought of everything.
Finally we will deploy our application via several methods.
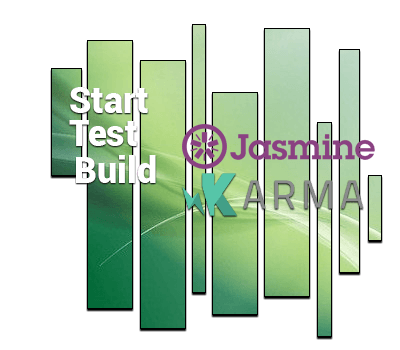
Tests: The Secret of My Success
Creating a web application is like creating any object.
We create a car, a television or an airplane for example.
And before giving it to someone we will test its operation.
Computer scientists said it might as well be simple and automatic.
As always, it's easier said than done.

A little history before we begin
Since its beginnings, the IT world has sought to improve itself.
Several working methods have been adopted.
To simplify, we could say that we are there
V-Cycle Method vs. Agile Method.
Is the fastest really the one we think?

But who did what?
If you want to work in programming, you will definitely have to be agile .
The most widely used Agile method currently is the Scrum method .
Below is a brief history of the last twenty years.
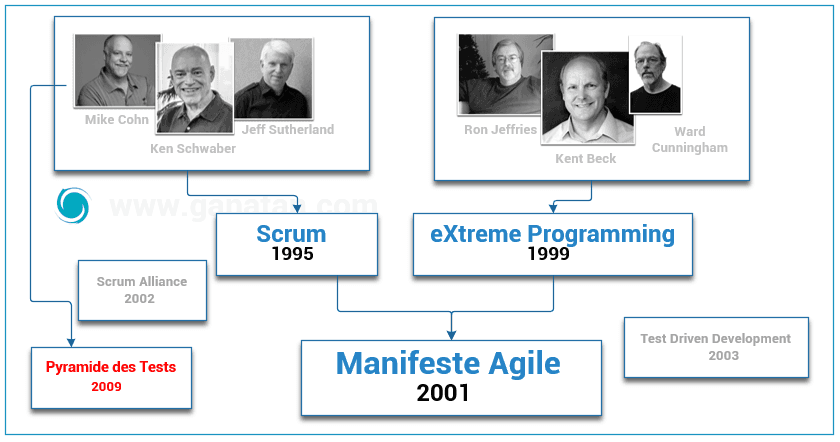
In November 2009 Mike Cohn described the test pyramid in his book
Succeeding with Agile: Software Development Using Scrum
With Angular we will focus on one category.
- Unit testing
Let's take a visual overview of Angular's architecture to visualize the tests.
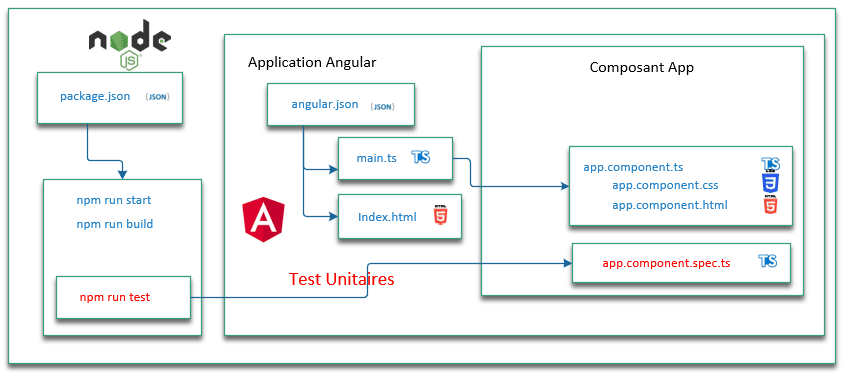
Testing with Angular
Without going into details, Angular makes our life easier with the following tools.
Unit tests use
- Karma
- Jasmine
End-to-end testing used
- Protractor
Note: Since Angular 12 end-to-end testing has been disabled.
The Angular documentation on the concept of coverage is available at this address https://angular.dev/guide/testing/code-coverage
I add in package.json an additional script to test the coverage
" coverage ": "ng test --no-watch --code-coverage",
To launch them we use the corresponding scripts contained in the Package.json file
# Unit tests
npm run test

# Unit tests with coverage
npm run coverage
Edit and verify
Let's do it
- A simple test modification and debugging
- A source code control test.
- Debugging.
Any modification results in a recompilation of the code.
For example Edit the app.component.html file
Congratulations and Modifications! Your app is running.
The compilation is then executed automatically and the browser refreshes.
Noticed :
The favicon.ico file represents your application's icon.
You can customize it.
In this example you can retrieve the one from this repository.
# Execute
npm run start

# Test
http://localhost:4200/

# Make changes
Code verification
As a computer scientist, we will try to simplify our lives.
Might as well get some help writing our code.
One of the tools used is linting which helps improve the quality of the code.
Angular used the TSLint tool available at
this address https://palantir.github.io/tslint/
Noticed
This command has been disabled since Angular 12.
We are waiting for the next tool recommended by Angular (probably ESLint?).
As the Google team has not decided, we will integrate ESLint into our project.
For this we will use Schematics which is an Angular code generator based on basic templates.
The ng lint command performs static analysis of TypeScript source code.
# Installation via schematics
ng add @angular-eslint/schematics

# Answer yes to the question
The package @angular-eslint/schematics@19.6.0 will be installed and executed.

# Test the code source
npm run lint
Schematics added a script in the package.json file (lint)
and created an eslint.config.js file
To check that our linter is working
Let's add specific rules in the eslint.config.js file
Note change this property
- "no-var": " error "
an error will be reported on using var - "no-var": " off "
No errors will be reported on the use of var
To check the behavior of the linter.
Let's modify a file for example app.component.ts
And let's write code that doesn't follow the rules.
We test with the npm run lint script which will give an error
Unexpected var, use let or const instead no-var
    rules: {
      "@angular-eslint/directive-selector": [
        "error",
        {
          type: "attribute",
          prefix: "app",
          style: "camelCase",
        },
      ],
      "@angular-eslint/component-selector": [
        "error",
        {
          type: "element",
          prefix: "app",
          style: "kebab-case",
        },
      ],
      "@angular-eslint/component-class-suffix": [
        "error",
        {
          suffixes: ["", "Component"]
        }
      ],
      "semi": ["error", "always"],
      "comma-dangle": ["error", "always-multiline"],
      "no-undefined": "error",
      "no-var": "error",
      "prefer-const": "error",
      "func-names": "error",
      "id-length": "error",
      "newline-before-return": "error",
      "space-before-blocks": "error",
      "no-alert": "error"
    },
import { Component } from '@angular/core';
import { RouterOutlet } from '@angular/router';

@Component({
  selector: 'app-root',
  imports: [RouterOutlet],
  templateUrl: './app.html',
  styleUrl: './app.css'
})
export class App {
  protected title = 'angular-starter';


  checkError() {
    var err = 10;

    return err;
  }
}

Environment
The Angular team has decided to stop automatically integrating environment settings.
Newer developers who were less keen on configuration issues did not use these settings.
The Angular documentation is available at this address
https://angular.dev/tools/cli/environments#configure-environment-specific-defaults
The command is as follows: ng generate environments
The elements necessary for its operation are created automatically.
- Creating a src/environments directory
- Creating an environment.development.ts file
- Creating an environment.ts file
- Editing the angular.json file
export const environment = {};export const environment = {};
          "configurations": {
            "production": {
              "budgets": [
                {
                  "type": "initial",
                  "maximumWarning": "500kB",
                  "maximumError": "1MB"
                },
                {
                  "type": "anyComponentStyle",
                  "maximumWarning": "4kB",
                  "maximumError": "8kB"
                }
              ],
              "outputHashing": "all"
            },
            "development": {
              "optimization": false,
              "extractLicenses": false,
              "sourceMap": true,
              "fileReplacements": [
                {
                  "replace": "src/environments/environment.ts",
                  "with": "src/environments/environment.development.ts"
                }
              ]
            }
          },
Deployment
Everything we have done is very nice.
But a web application is only of interest if we make it accessible on the web.
This is called deployment .
We will see how to do it via two methods from the simplest to the most complicated.
But first let's talk compilation .
As we saw previously the package.json file contains a number of scripts (or commands).
The script we are interested in is npm run build
It allows us to compile our application.
This script runs the Angular CLI ng Build command
Without going into details, here is how it works.
Via this command Angular uses the Webpack tool (a module bundler) to create the final product.
Running this command will create a dist directory.
This will contain what can be called the final product (or deliverable or artifact).
This is the part that we are going to deploy.
The advice given by Angular is at the following address
https://angular.dev/tools/cli/deployment
Deployment with lite-server
The simplest deployment is to use the Http server developed by John Papa.
How to proceed?
- We install the lite-server library globally with npm
- We run the application in production mode
# Compiling the project !!!!!!!! Very important not to forget
npm run build

# Installing the lite-server development server
npm install -g lite-server

# Running our application
lite-server --baseDir="dist/angular-starter/browser"

# Test the application in our browser with the following url
http://localhost:3000/
Deployment with nginx
A more complex solution but closer to reality.
We will need to have a virtual server or VPS (Virtual private server).
I recommend you to buy one from a VPS provider.
For example, OVH or Digital Ocean are among the cheapest and most efficient.
The following tutorial may be useful to you
Install Angular on an Ubuntu Server
On our server (example of a server with ubuntu and the ip address 192.168.100.1)
- Install nginx
- Test nginx
- Copy our dist directory to /var/www/html
- Test the server
# connection to the server via ssh
ssh root@192.168.100.1

# installing nginx on the server
sudo apt-get --yes install nginx
sudo apt-get update

# Start the nginx service
sudo service nginx start

# Test the nginx server installation
http://localhost:192.168.100.1/

# Copy the contents of the dist/angular-starter/browser directory # to the server in the /var/www/html/ directory
# Tester l'application


http://localhost:192.168.100.1/
Configuring nginx
I am adding two files that will be useful to you.
- an example of an nginx.conf configuration file
- an example of a server.js javascript file to launch your application locally
To be used with the node server.js command
The following script is to be added in package.json
"serve": "node server.js"
user www-data;
worker_processes auto;
pid /run/nginx.pid;
error_log /var/log/nginx/error.log;
include /etc/nginx/modules-enabled/*.conf;

events {
  worker_connections 768;
}

http {
  sendfile on;
  tcp_nopush on;
  types_hash_max_size 2048;

  include /etc/nginx/mime.types;
  default_type application/octet-stream;

  ssl_protocols TLSv1 TLSv1.1 TLSv1.2 TLSv1.3; # Dropping SSLv3, ref: POODLE
  ssl_prefer_server_ciphers on;

  access_log /var/log/nginx/access.log;
  gzip on;
  include /etc/nginx/conf.d/*.conf;
  server {
    listen 80 default_server;
    listen [::]:80 default_server;

    root /var/www/html;
    index index.html index.htm index.nginx-debian.html;
    server_name _;
    location / {
      try_files $uri $uri/ =404;
    }

  }
}
const express = require('express');
const path = require('path');
const app = express();

app.use(express.static(path.join(__dirname, 'dist/angular-starter/browser')));

app.get('/*', function (req, res) {
  res.sendFile(path.join(__dirname, 'dist/angular-starter/browser', 'index.html'));
});

const port = 4000;
const host = 'localhost';
app.listen(port, () => {
  console.log(`Server running at http://${host}:${port}`);
})
Notre Code Source Angular
This guide helped us create a ready-to-run web application.
To make things easier for you, you can directly use the source code of this application to test it and verify that it works.
To do this, simply use the Git software .
I'll show you how to do it.
This first application nevertheless remains basic.
Finally, I will offer you a number of steps that will allow you to create a more complex application.
Using Git with Source Code
By following each of the tips I gave you in this guide you will end up with an Angular source code.
This code represents your work and should be given your full attention.
As we saw previously, Git will allow us to manage all our source codes.
A quick look at Wikipedia https://en.wikipedia.org/wiki/GitHub tells us that
GitHub is the world's largest source code hosting service.
In January 2023 we count
- 100 million users
- Over 420 million repositories
I therefore advise you to publish your sources on this host.
The source code for this tutorial is of course available on GitHub.
Use git to fetch this code and verify that it works.
You just need to go to the following address
https://github.com/ganatan/angular-starter
If you liked this guide and you go to GitHub to check out the code, feel free to click STAR .

Otherwise, to go even faster, follow the following advice.
Use the classic command prompt under Windows (cmd) or Linux.
Then type the list of commands
# Create a demo directory (the name is arbitrary here)
mkdir demo

# Go to this directory
cd demo

# Get the source code on your workstation
git clone https://github.com/ganatan/angular-react-starter.git

# Go to the directory that was created
cd angular-react-starter
cd frontend-angular

# Run the dependencies (or libraries) installation
npm install

# Run the program
npm run start

# Check its operation by launching the command in your browser
http://localhost:4200/
To go further
This tutorial allowed us to create our first application.
This remains relatively simple.
If you want to create a more complete application, you will need to implement some additional principles and features such as
- Routing (multiple page management)
- Lazy loading (speed of the application)
- PWAs (works on mobile and desktop)
- Server Side Rendering (enable SEO)
The next step is logically the management of Routing.
It requires a complete tutorial which is at the following address
The following steps will get you a prototype application.
- Step 3: Lazy loading with Angular
- Step 4: Bootstrap with Angular
- Step 5: Modules with Angular
- Step 6: Server Side Rendering with Angular
- Step 7: Progressive Web App with Angular
- Step 8: Search Engine Optimization with Angular
- Step 9: HttpClient with Angular
The following steps will help you improve this prototype
This last step allows you to obtain an example application
The source code for this final application is available on GitHub
https://github.com/ganatan/angular-node-java-ai
The end

How to create a From scratch application?
Create your ganatan account
Download your complete guides for free
Démarrez avec angular CLI 
Gérez le routing 
Appliquez le Lazy loading 
Intégrez Bootstrap 
Utilisez Python avec Angular 
Utilisez Django avec Angular 
Utilisez Flask avec Angular 
